Summer is made for color, fun, and a little bit of drama — and watermelon nails deliver all three without breaking a sweat. They’ve been a warm-weather staple for years now, and somehow they keep getting better. More creative, more versatile, more everywhere. If you’ve been on the fence about trying them, consider this your sign.
The Classic Watermelon Nails Look (And Why It Still Slaps)
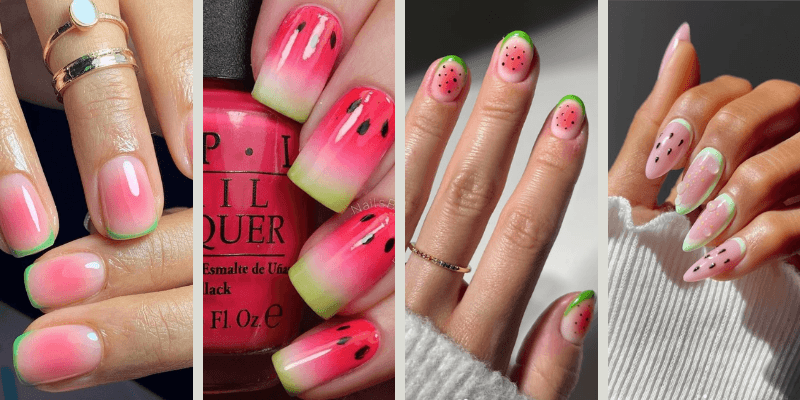
The OG watermelon nails design is exactly what you’d picture: a bright pink or red base with small black oval dots scattered across it, finished with a green tip to mimic the rind. Simple, clean, immediately recognizable.
Here’s what makes this work so well as a summer nail:
- The pink base: Most people go with a bright coral-pink or a deep watermelon red. Both are correct choices. The coral leans more playful and beachy; the deeper red feels a little more polished.
- The seeds: These are what tie the whole thing together. Using a thin nail art brush or a dotting tool, place 2–4 small black ovals per nail. They don’t need to be perfect — in fact, slightly imperfect seeds look more natural and charming.
- The green tip: A thin band of green across the top edge (or the base, depending on your preference) completes the watermelon slice effect. A forest green or bright lime both work depending on how bold you want to go.
This classic version is genuinely one of the most watermelon nails easy designs to recreate at home. If you can do a basic French tip, you’ve already got the skills for this.
How to Do Watermelon Nails at Home
A lot of people assume watermelon nail art is something you can only get done at a salon. Not true. Here’s how to make watermelon nails from scratch without needing a professional setup.
What you’ll need:
- Base coat
- Bright pink or red nail polish (the watermelon color)
- Black nail art pen or thin brush + black polish
- Green nail polish
- Top coat
- A dotting tool or toothpick
Step 1: Apply your base coat. Always. Skipping this step is how you end up with stained nails three weeks later.
Step 2: Apply two coats of your pink or red polish. Let each coat dry fully. Rushing this is the number one mistake people make at home — wet polish smears and ruins everything.
Step 3: Once fully dry, use your green polish to paint a thin line across the tip of each nail. You can do this freehand or use nail tape for a sharper line. The green rind section should be about 1/5 of the total nail length.
Step 4: Use a dotting tool or the end of a toothpick dipped in black polish to place your seeds. Aim for 3–5 seeds per nail in a scattered pattern. Slightly angled ovals look more realistic than perfect circles.
Step 5: Let everything dry completely, then seal with a glossy top coat.
That’s genuinely how to do watermelon nails at home in under 30 minutes once you’ve got the hang of it. The first attempt might take longer, but by the second or third try, it becomes pretty muscle-memory.
Watermelon Nails Acrylic
Want long, dramatic nails with the watermelon design? Watermelon nails acrylic is the move. Acrylic extensions give you a solid canvas that holds nail art beautifully, and the extra length means more room to get creative with the design.
On longer acrylic nails, the watermelon slice design gets even more interesting. You can fit a more detailed scene — a larger rind, more seeds, maybe even a tiny drip effect along the tip to suggest the juicy texture of a real watermelon slice. Some nail artists even add a subtle glitter layer over the pink base to mimic the way a watermelon’s flesh catches light.
Popular acrylic shapes for this look include:
- Coffin: Long and dramatic, great for bold watermelon art
- Almond: Elegant and slightly tapered, keeps the look a little more refined
- Square: Very clean and works beautifully for the classic simple design
Watermelon Nails Short
There’s a misconception that nail art only looks good on long nails. Not even close. Watermelon nails short are actually some of the cutest executions of the trend — and they’re way more practical for people with active lifestyles.
On short nails, the key is simplicity. You don’t have room for a super detailed scene, so lean into the minimalist version: a clean pink base, 2–3 seeds, and a slim green tip. It reads immediately as watermelon without being cluttered.
Alternatively, try negative space watermelon nails on short lengths — leaving part of the nail bare or nude and just adding seed accents near the tip. It’s modern, unexpected, and really easy to do.
Short nails also work great for a mixed set: one or two nails with the full watermelon design and the rest in a coordinating solid pink or green. This is a great approach if nail art feels intimidating — you only have to execute the detailed design on one or two nails.
Creative Watermelon Nails Ideas Worth Trying
Beyond the classic, there are some genuinely fun variations in the watermelon nails ideas space right now.
Watermelon Cat Eye Nails
This one’s a bit more advanced, but stunning. Watermelon nails cat eye uses a magnetic cat eye polish — usually in a deep wine or rose tone — as the base, giving the nails a dimensional, glassy look. Then the seed and rind details are layered on top. The result is a watermelon design that almost looks like it’s glowing from the inside.
Neon Watermelon Nails
Swap the regular pink for a neon pink or hot coral, and suddenly the whole look gets a serious energy boost. Neon nails are huge in summer anyway, and the neon watermelon combo is a natural fit. Pair with a neon green rind for maximum impact.
Watermelon French Tips
Instead of the rind at the tip, flip the design: do a classic French manicure but use a bright watermelon pink for the tip instead of white. Add tiny seeds just inside the tip line. Clean, wearable, and distinctly summer.
Abstract Watermelon Art
Rather than a literal slice, some people are going for abstract interpretations — watermelon-colored swirls, geometric shapes using the red, green, and black palette, or even watermelon-print patterns that suggest the fruit without being literal. This works especially well for people who want summer nail inspo that’s a little more artistic and less “costume-y.”
Watermelon Ombre
A gradient from white or nude at the base blending into deep watermelon pink or red at the tip, finished with seed details. It’s softer than the solid color version but still clearly part of the watermelon nails design summer canon.
3D fruit-themed almond nails
These are 3D fruit-themed almond-shaped nails featuring designs like strawberries, lemons, and watermelon slices. Manicure with Builder Gel overlay on natural nails • Free style design using Pigments & 3D Gel.
Acrylic watermelon nail designs with glitter and rhinestones:
Start with long coffin acrylics and a nude gel base, then give each nail a different watermelon treatment — a full pink slice with green rind and black seeds, a drip design with trailing pink drops, a chunky glitter tip, and a rhinestone accent nail. Use a thin detailing brush for the drips, nail tape for clean rind lines, and finish with two layers of top coat to lock everything in.
Watermelon Nails Color Inspo
The watermelon nails color palette seems obvious at first — pink, green, black — but there’s more nuance in it than you’d think.
For the pink/red base, consider:
- Bright coral pink: Most summery, very beachy
- Hot pink: Bold and fun, great for neon versions
- Deep red-pink: A little more sophisticated
- Soft bubblegum pink: Cute and sweet, works great on shorter nails
For the green rind, consider:
- Bright lime green: High contrast, very vibrant
- Forest or jade green: More classic watermelon rind color
- Mint: Softer, works beautifully with pastel pink bases
For the seeds, straight black is the standard. But some people use very dark navy or deep brown for a softer look. White seeds on a neon base can also look striking and unexpected.
The combo of colors is what makes this a distinctly summer nail — it’s warm, it’s bright, it reads as fun immediately. That’s why watermelon summer nails have become such a reliable seasonal staple.
Gel vs. Regular Polish
If you’re getting this done at a salon or investing in a home gel setup, watermelon nails gel is absolutely worth it. Gel polish lasts significantly longer — typically 2 to 3 weeks without chipping — compared to regular polish which might start wearing at the tips after 5–7 days depending on your lifestyle.
For summer specifically, gel makes more sense because hands are in and out of water more often. Pool days, dishwashing on vacation, sweaty hands — all of these are enemies of regular polish.
The design process for gel watermelon nails is the same as regular, just cured under a UV or LED lamp between each color layer. Most nail techs can execute the classic watermelon design in gel without any issue; it’s a well-known request at this point.
One downside: removing gel at home can damage nails if done incorrectly. Always soak properly with acetone and avoid peeling.
Tips for Making Your Nails Last Longer
No matter how good the design looks leaving the salon (or your bathroom), it needs to hold up. Here’s what actually helps:
Apply a fresh top coat every 2–3 days. This is probably the single biggest thing you can do to extend the life of any nail design. It seals any micro-cracks forming at the tip and keeps the color looking fresh.
Wear gloves for cleaning and dishes. Harsh cleaning products destroy polish fast. A pair of rubber gloves under the sink costs almost nothing and adds days to your manicure.
Avoid using your nails as tools. Opening cans, peeling stickers, scraping things — all of these chip the tips faster than almost anything else.
Moisturize your cuticles. Dry, cracked cuticles make even great nail art look rough. Cuticle oil applied daily makes a real visual difference.
Will You Try Watermelon Nails This Summer?
Watermelon themed nails are one of those trends that feel like they could get old, but somehow never do. Every summer they come back around and people are still obsessed — and for good reason. They’re cheerful, they’re recognizable, they’re genuinely fun to wear.
Whether you’re going with the classic watermelon nails simple design, experimenting with the cat eye version, or getting creative with neon and ombre twists, there’s a version of this look that works for every nail length, every skill level, and every style.
Life’s too short for boring nails in summer.

Hi, I’m Maleesha, a fashion writer who focuses on practical outfit ideas for everyday wear. I share styling tips based on real-life scenarios, budgets, and comfort — not just trends.
Leave a Reply