This post shows you Flower Nail Ideas
This site contains affiliate links, view the disclaimer for more information.
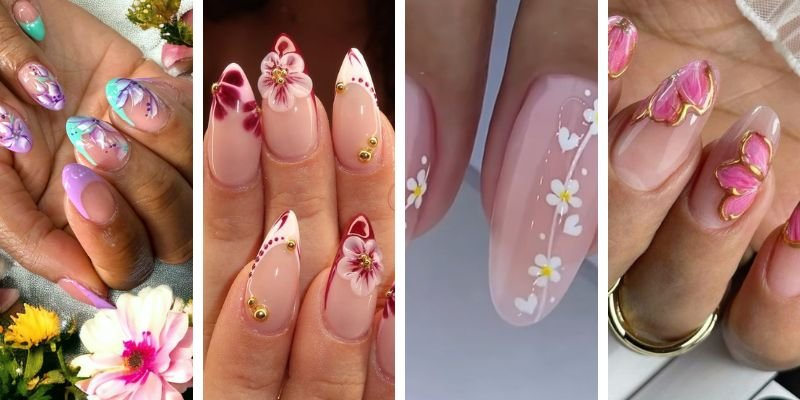
Something about flower nail art that just screams fresh start. Maybe it’s the way a tiny painted petal can perk up a gloomy day, or how floral designs feel like a mini garden you carry around. Either way, flower nails ideas are everywhere this season — from classic daisies to bold tropical blooms.
Below, you’ll find a stash of my favorite flower nails designs and simple tricks to get them just right, whether you’re headed to a salon or braving it at home. Ready? Let’s dig in — pun intended.
Flower Nails Ideas to Make Your Manicure Bloom

When it comes to flower nails ideas, it helps to think about the vibe you’re going for. Do you want your nails to look playful? Romantic? Maybe you’re into minimalist floral nails or dramatic garden-party nails with every color under the sun.
One trick I swear by: match your floral nail art to the season. Pastels and daisies feel right for spring, while bold hibiscus or tropical nails are perfect for summer. For winter, deep berry tones with subtle floral accents add just enough pop without feeling off-season.
Mix and match colors — don’t be afraid to layer different flowers, either. Sometimes a single bloom on each nail looks cute. Sometimes you’ll want a full bouquet on one accent nail.
Flower Nails Design Tips for a Salon-Quality Look

A good flower nails design starts with a solid base coat. DON’T skip it — that’s the difference between a mani that lasts two days and one that hangs on for a week or more.
Fine detail brushes are your best friend. If you’re doing DIY flower nail art, get a tiny brush or a dotting tool. The secret? Tiny dots become petals when you drag them slightly with a toothpick or needle.
Top coat is non-negotiable, too. Floral designs chip faster because they’re painted in layers — seal that beauty in. If you can, cure your nails under a UV lamp for gel flower nails that won’t budge.
Tropical Nails
Tropical nails are the ultimate summer flower nails idea. Think hibiscus flower nails, palm leaves, and bursts of neon.
If you’re new to painting, start with a base of turquoise or coral. Use a bright pink or red to paint a simple hibiscus flower. Dot a yellow center and drag tiny lines outward to mimic the stamen.
I once tried tropical nails before a beach trip — and let’s just say the sunscreen and salty water did a number on my cuticles. Keep some cuticle oil handy and reapply top coat mid-trip if you want your tropical nail art to survive the sand.
Pretty in Pink: Flower Nails Pink
Flower nails pink designs are timeless. There’s just something so romantic about soft pink paired with delicate petals.
One easy idea: pale pink base, white daisy nail art on top. Or flip it — go hot pink with tiny rose designs for a bold look.
A fun twist is using dried real flowers. Pressed flowers sealed in gel polish look gorgeous against a nude or pink background. They’re a little more advanced, but you can find kits online to help. Also, they contrast stunningly with darker skin tones!
Soft & Sweet: Pastel Nails with Flowers
Pastel nails are basically a blank canvas for flower nail art. Lavender, mint, baby blue — all dreamy shades for spring.
Pastel floral nails pair well with tiny blooms scattered randomly. It doesn’t have to be perfect. Sometimes the less “perfect” the flowers are, the cuter they look.
Try mixing pastel nails with a single bold accent flower — like a vivid sunflower or daisy on one finger. It makes the whole manicure feel fresh and not overly busy.
Floral Nails for Every Mood
Floral nails are so versatile — they fit every mood. Feeling elegant? Try a classic rose design on a nude base.
Want something edgy? Black matte polish with white flower accents is unexpectedly cool.
If you’re after subtle floral nails, go for tiny clusters of blossoms at the cuticle area only. It gives a delicate vibe that works well for weddings or special occasions.
Flower Nails Simple Enough for Beginners
Flower nails simple designs can look stunning — trust me, you don’t need an art degree for these.
Start with polka-dot flowers: paint your base color, then use a bobby pin or dotting tool to make five dots in a circle. Add a different color dot in the center — done.
Another simple flower nail idea is using stickers or decals. They’re foolproof and you can seal them with a good top coat to last longer.
Flower Nails Easy and Quick
For a flower nails easy look, stick to one or two accent nails. You don’t have to cover every finger.
Try press-on nails if you’re short on time. Tons of cute floral press-ons are out there now, and some look so real people think you spent hours at the salon.
Quick tip: keep a pack of tiny dried flowers around. They’re the ultimate hack for easy flower nail art — just stick ‘em on wet polish and top coat.
Go Bold: Flower Nails Acrylic Designs
Acrylic nails are perfect if you want a sturdy canvas for flower nail art. Acrylic holds 3D embellishments better than regular polish.
I’ve seen some wild flower nails acrylic sets — think rhinestones, 3D sculpted petals, and glitter accents.
One thing, though: find a tech who’s good with nail art. Acrylic designs take skill, and not everyone can do detailed floral work. Bring photo inspo and don’t be shy about asking for exactly what you want.
Sweet Little Daisies

Daisy nails never go out of style. They’re the classic flower nails idea that works for any age.
You can do daisy nails in so many ways — white petals with yellow centers on a pastel base, or tiny daisies scattered like confetti.
They look especially cute on short nails. If you’ve ever seen clear daisy nails, that’s a fun twist too — just a clear base with daisies “floating” on top.
Fun Spring Nails for Happy Hands
Fun spring nails are all about color and playfulness. Mix flowers with dots, swirls, or even tiny fruits for a garden-party vibe.
Don’t worry about matching every nail — mismatched designs look intentional and artsy.
One tip for fun spring nails: try using two base colors and switching up which nails get flowers. It adds visual interest without extra effort.
Hibiscus Flower Nails for Tropical Vibes
Hibiscus flower nails are a go-to for tropical vacations or summer parties. Big, bold petals in fuchsia or red look stunning on a bright background.
These flowers can be tricky freehand, so stencils help. Or cheat a little with decals if you’re doing it yourself.
Pair hibiscus flower nails with palm leaves or gold foil accents — it screams vacation mode.
Beach Nails with a Floral Twist
Beach nails can totally include flowers. Think ocean blues, sandy beige, and pops of tropical blooms.
I once tried ombre beach nails with tiny starfish and plumeria flowers painted on top — cutest combo ever.
Seal everything in with a thick gel top coat so saltwater doesn’t ruin your masterpiece.
Flower Nail Art for Any Skill Level

Flower nail art doesn’t have to be intimidating. Sometimes the simplest designs turn out the best.
Dotting tools, stickers, or even a toothpick work wonders. Practice on a piece of paper first if you’re nervous.
I really think imperfections add charm. If one petal’s crooked, roll with it.
Classic & Chic: French Tip Nails with Flowers
French tip nails with floral accents are classy with a twist.
Try adding tiny roses or cherry blossoms along the white tip. Or do a pastel French tip with dainty daisies near the cuticle.
French tips feel timeless but adding floral nail art makes them feel fresh again.
Fresh Flower Nail Art Ideas for Spring & Summer
For fresh flower nail art ideas, check out nature itself — garden walks can inspire color combos you’d never think of.
One fresh trend: watercolor flowers. These look soft and dreamy, almost like they’re painted on a canvas.
Another fun idea is flower nail foils — metallic floral prints that you press onto your polish. They catch the light beautifully.
How to Get Flower Nails at Home (Step-by-Step)
Getting flower nails at home isn’t as tricky as it sounds. Here’s a quick step-by-step:
- Start with clean, filed nails.
- Apply a good base coat to protect your natural nails.
- Paint your base color — let it dry fully.
- Use a dotting tool, toothpick, or fine brush to make your flower design. Start with five dots in a circle for petals.
- Add a dot in the center.
- Clean up any mistakes with a small brush dipped in acetone.
- Seal with a clear top coat.
Extra tip: practice your flower designs on a piece of plastic or an old nail wheel first.
Cute & Easy Flower Nail Art You Can DIY
For cute & easy flower nail art, focus on tiny details that look impressive but aren’t hard to do.
One idea: single blooms near the cuticle with a clear or nude base. It feels modern and fresh.
Try mixing flowers with other designs like stripes or glitter. Or do a “negative space” flower nail — leave parts of your nail bare for a chic twist.
Just Have Fun with It
Flower nails should make you smile every time you look down at your hands. Don’t stress too much about perfection.
If you mess up, just swipe it off and try again — nail polish is forgiving like that.
The best flower nails ideas are the ones that feel you. So grab your tools, pick your blooms, and let those petals shine all season long.
Pin this guide or share with a friend who needs some floral inspo! And if you try any of these dreamy flower nails designs, tag your pics — I love seeing everyone’s blooming creativity. 🌸✨


Hi, I’m Maleesha, a fashion writer who focuses on practical outfit ideas for everyday wear. I share styling tips based on real-life scenarios, budgets, and comfort — not just trends.
Leave a Reply